Post by Frost on Mar 16, 2006 23:25:19 GMT -5
well, since I've been asked to do a tutorial about MS Paint, here it is. I just hope it is of help... I must admit I'm not the best, but atleast a few tips of mine could help.
ok enough of my blabber and lets begin.
STEP 1:

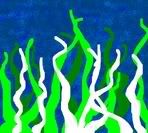
Begin by using the paint bucket and filling the entire page with the base color of your new work of art. Try to pick a color that will dominate the majority of your piece.
STEP 2:

Start to blend in other colors that you think would give it a nice accent. In the example above, I used the spray can to with two different lighter tones of blue.
STEP 3:

Use the eraser tool to prepare a spot for your next part of your work. This is most helpful if you plan to use a solid color in the entire erased area.
STEP 4:

Once your area is prepared, use the paint bucket and fill in the erased area with the desired. color.
***Repeat STEPs 3 and 4. until you acheive the desired look of the background.
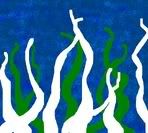
*** EXTRA TIP: It is best to work your way up to the foreground. Background first then the Foreground at the end. (well, at least it works for me. )
)
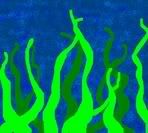
STEP 5:

Now begin working with your foreground... Just like in STEP 3, prepare your area by ereasing. A little note though, since some areas are too large to just use the eraser tool use the auto shapes that appear in your tool bar. For example, to get the base shape of the newly erased area, I had to use the circle/eliptical tool with the fill in option. After getting that shape cleared I drew the rest of the area and modified the area to the desired figure.
STEP 6:
Once cleared, fill in the area using the paint bucket tool. Just as in backgrounds, pick a base color that will be dominant.
STEP 7:

USing a very fine point, use the pencil tool to outline areas that will be in different color. Make sure that the area is well closed, or your paint bucket will leak into more areas than you wanted.
STEP 8:
Once done with your outlining, use your paint bucket and fill in those areas.
*** EXTRA TIP: if you like a smoother look to your image, pick the color of your outlining to match the color that will be used with the paint bucket.
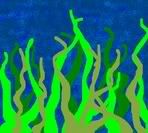
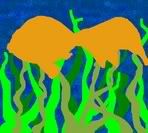
STEP 9:

once you have your base of what your image will look like, start to add some value to give it a little more 3-D-ish look to it. This can be done by picking a color very slightly darker than the base color. In the example above, I used the paint brush with the desired tone for the under eye and under belly. For the tail change in color I used the pencil with the desire tone and chreated yet another outline. Once done the the outline, I filled it in with the paint bucket tool.
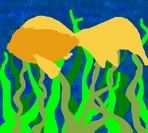
STEP 10:

Once you've finished with all the shading, you can add further details to wrap things up. you can use different tools to add the desired details and effect. For example, I used both the paint brush and the pencil to achieve this last result...

*********
Well, this concludes this tutorial. I hope this was of help and if there any questions feel free to ask me. hehe, don't worry, I don't bite... much . 
***************
EDIT: I just realized how small photobucket make my sample images. if anyone wishes to get the full sized sample images, just send me a PM, and we can make arrangements for me to email a zip file with all the images in it.
ok enough of my blabber and lets begin.
STEP 1:
Begin by using the paint bucket and filling the entire page with the base color of your new work of art. Try to pick a color that will dominate the majority of your piece.
STEP 2:
Start to blend in other colors that you think would give it a nice accent. In the example above, I used the spray can to with two different lighter tones of blue.
STEP 3:
Use the eraser tool to prepare a spot for your next part of your work. This is most helpful if you plan to use a solid color in the entire erased area.
STEP 4:
Once your area is prepared, use the paint bucket and fill in the erased area with the desired. color.
***Repeat STEPs 3 and 4. until you acheive the desired look of the background.
*** EXTRA TIP: It is best to work your way up to the foreground. Background first then the Foreground at the end. (well, at least it works for me.
)STEP 5:
Now begin working with your foreground... Just like in STEP 3, prepare your area by ereasing. A little note though, since some areas are too large to just use the eraser tool use the auto shapes that appear in your tool bar. For example, to get the base shape of the newly erased area, I had to use the circle/eliptical tool with the fill in option. After getting that shape cleared I drew the rest of the area and modified the area to the desired figure.
STEP 6:
Once cleared, fill in the area using the paint bucket tool. Just as in backgrounds, pick a base color that will be dominant.
STEP 7:
USing a very fine point, use the pencil tool to outline areas that will be in different color. Make sure that the area is well closed, or your paint bucket will leak into more areas than you wanted.
STEP 8:
Once done with your outlining, use your paint bucket and fill in those areas.
*** EXTRA TIP: if you like a smoother look to your image, pick the color of your outlining to match the color that will be used with the paint bucket.
STEP 9:
once you have your base of what your image will look like, start to add some value to give it a little more 3-D-ish look to it. This can be done by picking a color very slightly darker than the base color. In the example above, I used the paint brush with the desired tone for the under eye and under belly. For the tail change in color I used the pencil with the desire tone and chreated yet another outline. Once done the the outline, I filled it in with the paint bucket tool.
STEP 10:
Once you've finished with all the shading, you can add further details to wrap things up. you can use different tools to add the desired details and effect. For example, I used both the paint brush and the pencil to achieve this last result...
*********
Well, this concludes this tutorial. I hope this was of help and if there any questions feel free to ask me. hehe, don't worry, I don't bite... much .
***************
EDIT: I just realized how small photobucket make my sample images. if anyone wishes to get the full sized sample images, just send me a PM, and we can make arrangements for me to email a zip file with all the images in it.